在使用CSS进行网页布局时,我们一定离不开的一个东西————盒子模型。盒子模型,顾名思义,盒子就是用来装东西的,它装的东西就是HTML元素的内容。或者说,每一个可见的 HTML 元素都是一个盒子,下面所说的盒子都等同于 HTML 元素。这里盒子与盒子模型中的盒子又有点不同,这里的盒子是二维的。
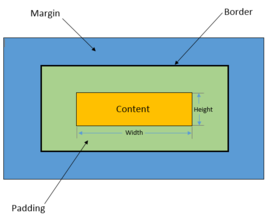
盒子的组成
盒子模型是网页设计中经常用到的一种思维模型,由四个部分构成,从内到外分别为内容区(content)、内边距(padding)、边框(border)和外边距(margin),CSS 为这四个部分提供了一系列相关属性,通过对这些属性的设置可以丰富盒子的表现效果。
盒子的大小
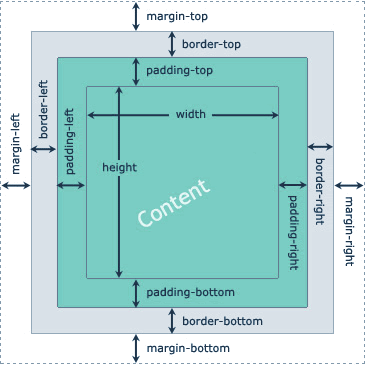
盒子的大小指的是盒子的宽度和高度。大多数初学者容易将宽度和高度误解为width和height属性,然而默认情况下width和height属性只是设置content(内容)部分的宽和高。盒子真正的宽和高按下面公式计算:
盒子的宽度 = 内容宽度 + 左填充 + 右填充 + 左边框 + 右边框 + 左边距 + 右边距
盒子的高度 = 内容高度 + 上填充 + 下填充 + 上边框 + 下边框 + 上边距 + 下边距
用带属性的公式表示:
盒子的宽度 = width + padding-left + padding-right + border-left + border-right + margin-left + margin-right
盒子的高度 = height + padding-top + padding-bottom + border-top + border-bottom + margin-top + margin-bottom
1. 内容区(content)
内容区是整个盒子模型的中心,其中存放了盒子的主要内容,这些内容可以是文本、图像等资源。内容区有 width、height、overflow 三个属性,其中 width 和 height 属性用来指定盒子内容区域的宽度和高度,当内容信息过多,超出内容区所设置的范围时,则可以使用 overflow 属性设置溢出内容的处理方式,overflow 属性有四个可选值:
(1)hidden:表示隐藏溢出的部分;
(2)visible:表示显示溢出的部分(溢出的部分将显示在盒子外部);
(3)scroll:表示为内容区添加一个滚动条,您可以通过滑动这个滚动条来查看内容区的全部内容;
(4)auto:表示由浏览器决定如何处理溢出部分。
<!DOCTYPE html>
<html>
<head>
    <style>
        div {
            background: #CFF;
        }
        div.box-one {
            width: 100px;
            height: 100px;
        }
    </style>
</head>
<body>
    <div>
        <div class="box-one">盒子模型</div>
    </div>
</body>
</html>
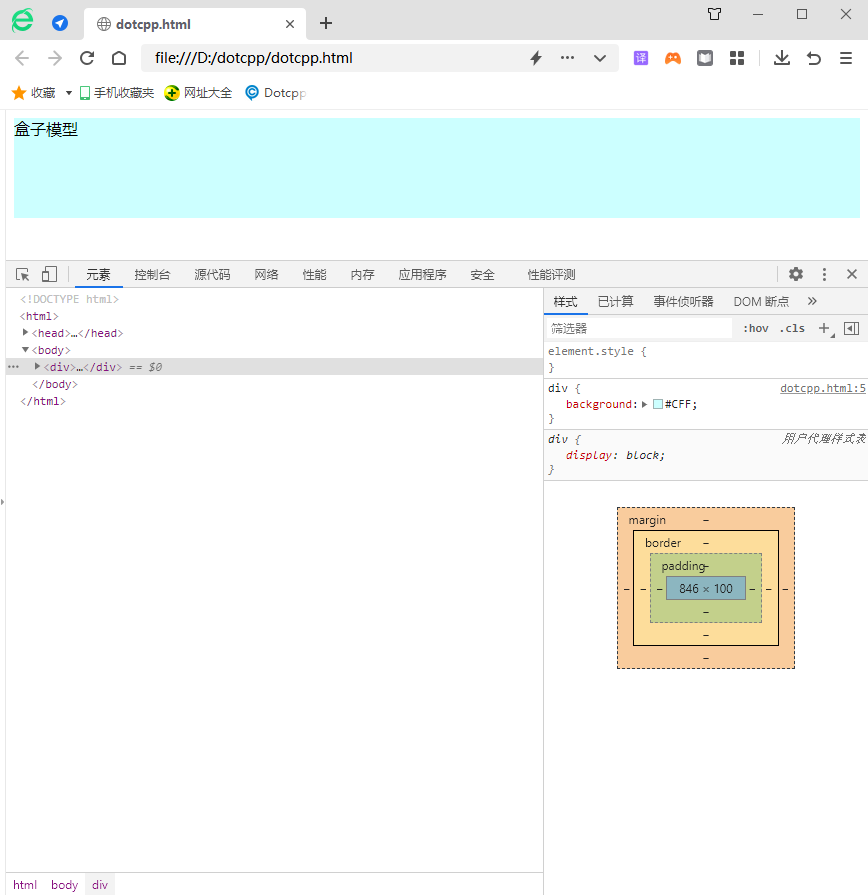
运行结果:(通过浏览器的调试工具查看的,可以快捷键F12来打开,或者在页面中点击鼠标右键,在弹出的菜单中选择“检查”选项即可。)
2. 内边距(padding)
内边距是内容区和边框之间的空间,您可以通过 padding-top、padding-right、padding-bottom、padding-left 以及它们的简写属性 padding 来设置内容区各个方向上与边框之间的距离。在为盒子模型设置背景属性时,背景属性可以覆盖到内边距区域。
| 属性 | 内容 |
| padding | 在一个声明中设置所有填充属性 |
| padding-top | 设置元素的顶部填充 |
| padding-bottom | 设置元素的底填充 |
| padding-left | 设置元素的左填充 |
| padding-right | 设置元素的右填充 |
举例:
<!DOCTYPE html>
<html>
<head>
    <meta charset="utf-8">
        <title></title>
        <style>
            .a{
                border: 1px solid #3C3C3C;
                width: 300px;
                height: 160px;
                margin: auto;
	    }
			h2{
                background-color:#0000FF;
                width: 300px;
                height: 50px;
                color: #FFFFFF;
                line-height: 50px;
                font-size: 20px;
                margin-top: 0px;
                margin-bottom: 0px;
			}
			form{
                width: 300px;
                height: 110px;
                background-color: #00FFFF;
			}
    </style>
    </head>
    <body>
                <div class="a">
                <h2>会员登录</h2>
        <form action="#">
    <div>
                <strong class="name">姓名:</strong>
                <input type="text"/>
        </div>
    <div>
                <strong class="name">邮箱:</strong>
                <input type="text"/>
        </div>
    <div>
                <strong class="name">电话:</strong>
                <input type="text"/>
        </div>
    </form>
    </div>
</body>
</html>
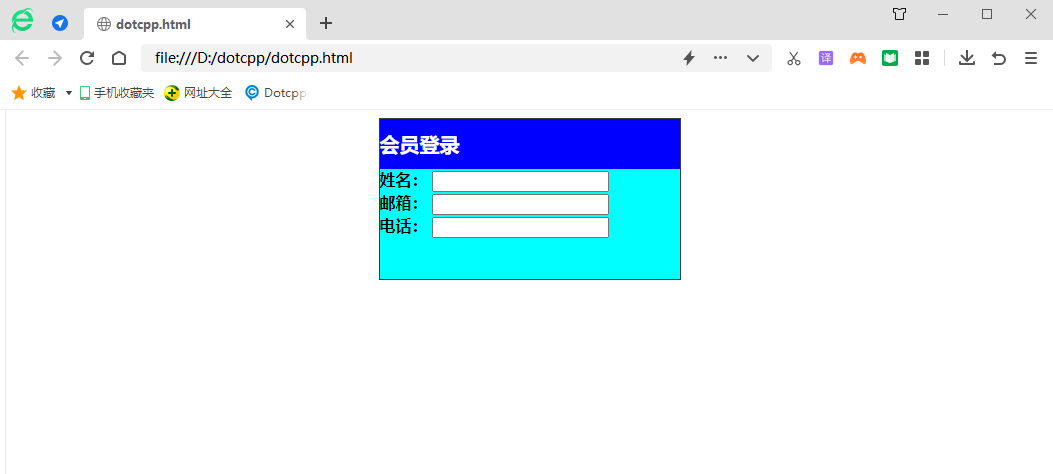
运行结果:
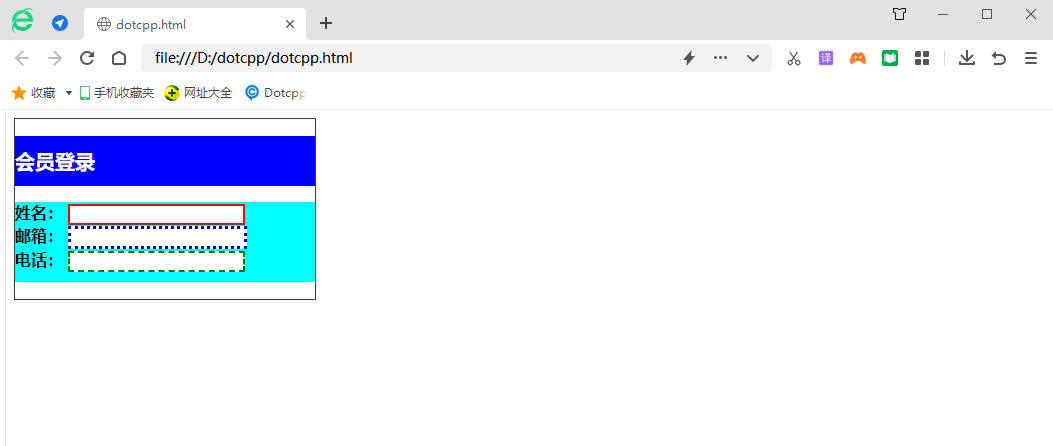
3. 边框(border)
边框是环绕内容区和内边距的边界,您可以使用 border-style、border-width 和 border-color 以及它们的简写属性 border 来设置边框的样式。其中 border-style 属性为边框中最主要的属性,如果没有设置该属性的话,其它的边框属性也会被忽略。
举例:
<!DOCTYPE html>
<html>
<head>
        <meta charset="utf-8">
        <title></title>
        <style>
			.a{
            border: 1px solid #3C3C3C;
            width: 300px;
            height: 180px;
            }
            h2{
            background-color:#0000FF;
            width: 300px;
            height: 50px;
            color: #FFFFFF;
            line-height: 50px;
            font-size: 20px;
            }
            form{
                background-color: #00FFFF;
		width: 300px;
		height: 80px;
		}
		div:nth-of-type(1) input{
		border: 2px solid red;
		}
		div:nth-of-type(2) input{
		border: 3px dotted blue;
        }
		div:nth-of-type(3) input{
		border: 2px dashed green;
        }
		</style>
</head>
<body>
		<div class="a">
		<h2>会员登录</h2>
		<form action="#">
		<div>
		<strong class="name">姓名:</strong>
		<input type="text"/>
				</div>
				<div>
					<strong class="name">邮箱:</strong>
					<input type="text"/>
				</div>
				<div>
					<strong class="name">电话:</strong>
					<input type="text"/>
				</div>
			</form>
		</div>
</body>
</html>
运行结果:
4. 外边距(margin)
| margin | 在一个声明中设置所有外边距属性 |
| margin-top | 设置元素的上外边距 |
| margin-bottom | 设置元素的下外边距 |
| margin-left | 设置元素的左外边距 |
| margin-right | 设置元素的右外边距 |
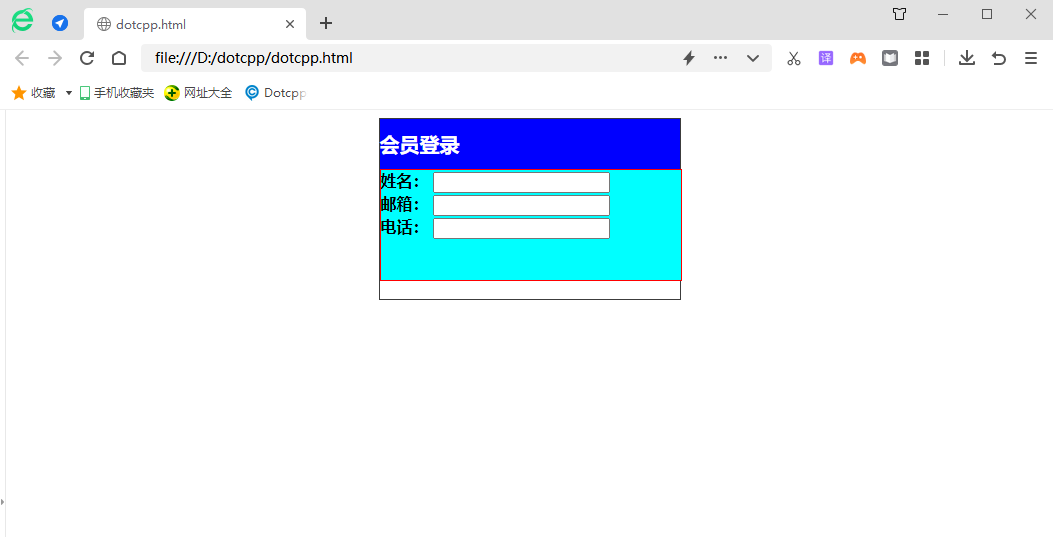
举例:
<!DOCTYPE html>
<html>
<head>
    meta charset="utf-8">
    <title></title>
    <style>
        .a{
        border: 1px solid #3C3C3C;
	width: 300px;
	height: 180px;
	margin: auto;
	}
			h2{
				background-color:#0000FF;
				width: 300px;
				height: 50px;
				color: #FFFFFF;
				line-height: 50px;
				font-size: 20px;
				margin-top: 0px;
				margin-bottom: 0px;
			}
			form{
				border: 1px solid red;
				width: 300px;
				height: 110px;
				background-color: #00FFFF;

			}
			</style>
		</head>
		<body>
			<div class="a">
				<h2>会员登录</h2>
				<form action="#">
					<div>
					 	<strong class="name">姓名:</strong>
						<input type="text"/>
        </div>
    <div>
            <strong class="name">邮箱:</strong>
            <input type="text"/>
        </div>
    <div>
    <strong class="name">电话:</strong>
    <input type="text"/>
    </div>
    </form>
    </div>
</body>
</html>
运行结果:
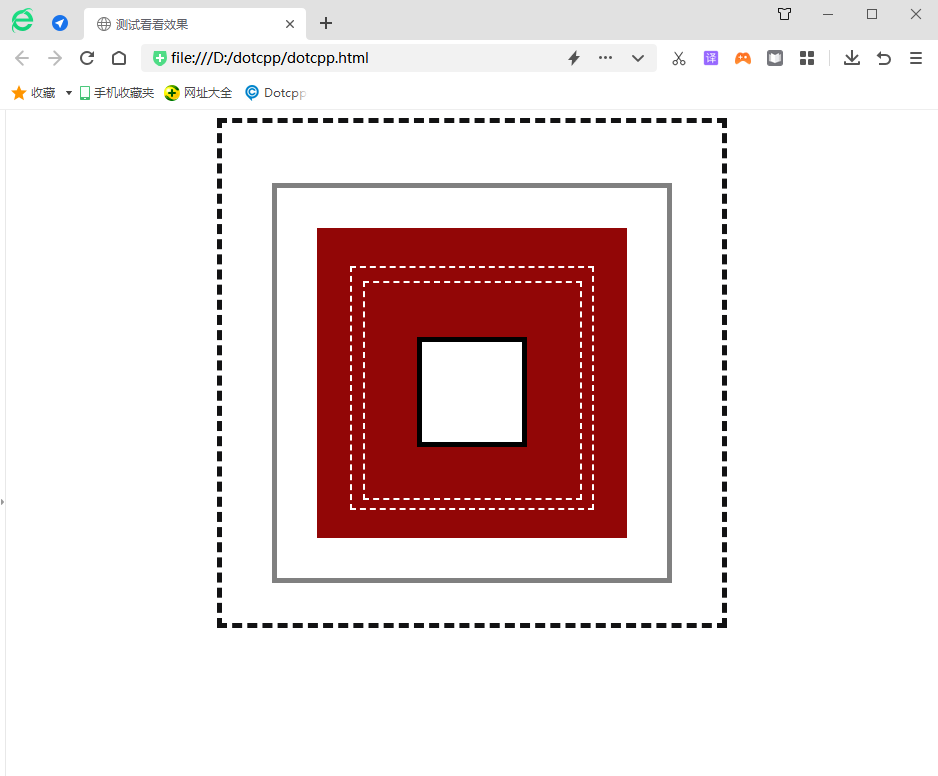
举例:
<!DOCTYPE html>
<html>

<head>
    <meta charset="UTF-8">
    <meta http-equiv="X-UA-Compatible" content="IE=edge">
    <meta name="viewport" content="width=device-width, initial-scale=1.0">
    <title>测试看看效果</title>
</head>
<style>
    #box1 {
        width: 400px;
        height: 400px;
        background-color: white;
        /* 设置上下 左右的内边距 */
        padding: 50px 50px;
        border: 5px dashed rgb(18, 18, 19);
        margin: 0 auto;
        margin-top: 5px;
        /* margin-left: 200px;
        margin-right: 200px;
        margin-bottom: 5px; */
        text-align: center;
    }

    #box2 {
        width: 350px;
        height: 350px;
        background-color: white;
        /* 设置上下 左右的内边距 */
        padding: 20px 20px;
        border: 5px solid gray;
        margin: 0 auto;
        margin-top: 10px;
        /* margin-left: 20px;
        margin-right: 20px;
        margin-bottom: 20px; */
        text-align: center;
    }

    #box3 {
        width: 300px;
        height: 300px;
        background-color: rgb(146, 6, 6);
        /* 设置上下 左右的内边距 */
        border: 5px solid rgb(146, 6, 6);
        margin: 0 auto;
        /* padding: 5px 5px; */
        margin-top: 20px;
        /* margin-left: 45px;
        margin-right: 45px;
        margin-bottom: 45px; */
        text-align: center;
    }

    #box4 {
        width: 240px;
        height: 240px;
        background-color: rgb(146, 6, 6);
        /* 设置上下 左右的内边距 */
        /* padding: 5px 5px; */
        border: 2px dashed white;
        margin: 0 auto;
        margin-top: 33px;
        /* margin-left: 33px;
        margin-right: 33px;
        margin-bottom: 33px; */
        /* 和padding效果一样 */
        text-align: center;
    }

    #box5 {
        width: 215px;
        height: 215px;
        background-color: rgb(146, 6, 6);
        /* 设置上下 左右的内边距 */
        border: 2px dashed white;
        margin: 0 auto;
        /* padding: 2px 2px; */
        margin-top: 12.5px;
        /* margin-left: 12.5px;
        margin-right: 12.5px;
        margin-bottom: 12.5px; */
        /* 和padding效果一样 */
        text-align: center;
    }

    #box6 {
        width: 100px;
        height: 100px;
        background-color: white;
        /* 设置上下 左右的内边距 */
        border: 5px solid black;
        margin: 0 auto;
        /* padding: 20px 20px; */
        margin-top: 54.5px;
        /* margin-left: 54.5px;
        margin-right: 54.5px;
        margin-bottom: 54.5px; */
        /* 和padding效果一样 */
        text-align: center;
    }
</style>
<body>
        <div id="box1">
        <div id="box2">
        <div id="box3">
        <div id="box4">
    <div id="box5">
       <div id="box6"></div>
        </div>
      </div>
    </div>
  </div>
</div>
</body>
</html>
运行结果:
C语言网提供由在职研发工程师或ACM蓝桥杯竞赛优秀选手录制的视频教程,并配有习题和答疑,点击了解:
一点编程也不会写的:零基础C语言学练课程
解决困扰你多年的C语言疑难杂症特性的C语言进阶课程
从零到写出一个爬虫的Python编程课程
只会语法写不出代码?手把手带你写100个编程真题的编程百练课程
信息学奥赛或C++选手的 必学C++课程
蓝桥杯ACM、信息学奥赛的必学课程:算法竞赛课入门课程
手把手讲解近五年真题的蓝桥杯辅导课程