前言:
本篇是上篇 黑客入门系列二 内存泄漏检测工具的完结篇,主要使用python和shell脚本做了二次封装
第一步 测试代码:
#include <stdio.h>
#include <stdlib.h>
static void fun(void)
{
  int *p1 = malloc(10);
  *p1 = 1;
  int *p2 = malloc(20); //内存泄漏
  *p2 = 2;
  free(p1);
}
static void fun1(void)
{
  int *p1 = malloc(100);
  *p1 = 1;
  int *p2 = malloc(200); //内存泄漏
  *p2 = 2;
  free(p1);
}
static void fun2(void)
{
  for (size_t i = 0; i < 10; i++)
  {
    int *p1 = malloc(300); //内存泄漏10次
    *p1 = 1;
  }
  int *p2 = malloc(400);
  *p2 = 2;
  free(p2);
}

int main(void)
{
  fun();
  fun1();
  fun2();
  return 0;
}
第二步 劫持代码:
#define _GNU_SOURCE
#include <stdio.h>
#include <stdlib.h>
#include <dlfcn.h>
#include <sys/mman.h>
#include <syscall.h>
#include <execinfo.h>
#include <unistd.h>
#include <strings.h>
#include <string.h>
#include <sys/types.h>
#include <sys/stat.h>
#include <fcntl.h>
#include <execinfo.h>
static void *(*mymalloc)(size_t) = NULL;
static void (*myfree)(void *) = NULL;
static int fd = 0;

void __attribute__((constructor)) init(void)
{
    mymalloc = dlsym(RTLD_NEXT, "malloc");
    myfree = dlsym(RTLD_NEXT, "free");
    if (!mymalloc)
    {
        fprintf(stderr, "unable to get malloc symbol!\n");
        exit(1);
    }
    if (!myfree)
    {
        fprintf(stderr, "unable to get free symbol!\n");
        exit(1);
    }

    fd = open("mem.log", O_CREAT | O_TRUNC | O_WRONLY, 0644);
    if (!fd)
    {
        fprintf(stderr, "unable to fopen!\n");
        exit(1);
    }
    fprintf(stderr, "init successfully wrapped!\n");
}
void *malloc(size_t size)
{
    void *p = mymalloc(size);
    const void *caller_addr = __builtin_return_address(0);
    char buf[100] = {0};
    sprintf(buf, "+ %p caller_addr %p size=%lu\n", p, caller_addr - 1, size);
    write(fd, buf, strlen(buf));
    return p;
}
void free(void *ptr)
{
    const void *caller_addr = __builtin_return_address(0);
    char buf[100] = {0};

    sprintf(buf, "- %p caller_addr %p free\n", ptr, caller_addr);
    write(fd, buf, strlen(buf));
    myfree(ptr);
}
void __attribute__((destructor)) end(void)
{
    close(fd);
    fprintf(stderr, "end successfully wrapped!\n");
}
第三步 python脚本:
import os
import subprocess


def Parsing(filename):
    men_lines_list = list()
    res={}
    with open(filename, "r") as fd:
        men_lines_list = fd.read().splitlines()

    for leak_item in men_lines_list:
        if leak_item.split()[1] not in res.keys():
            res[leak_item.split()[1]]=leak_item
        else:
            res.pop(leak_item.split()[1])
    cmd = 'addr2line -f -e helloworld -p -a '
    men_lines_list=res.values()
    for leak_item in men_lines_list:
        addr = leak_item.split()[-2]
        p = subprocess.Popen(cmd + addr, shell=True, stdout=subprocess.PIPE)
        res = p.stdout.read().split()
        resstring = leak_item.split()[0] + ' ' + leak_item.split()[1] + ' ' + ' 文件: ' + bytes.decode(
            res[3]) + ' 函数: ' + bytes.decode(res[1]) + ' 大小 : ' + leak_item.split()[-1]
        print(resstring)

if __name__ == '__main__':
    Parsing("mem.log")
第四步 shell脚本:
gcc example.c -o libexample.so -fPIC -shared -ldl  -g3   -lcstl
gcc  -g3  -no-pie helloworld.c   -o helloworld
export LD_PRELOAD=./libexample.so
./helloworld
export LD_PRELOAD=
python3 addr2line.py
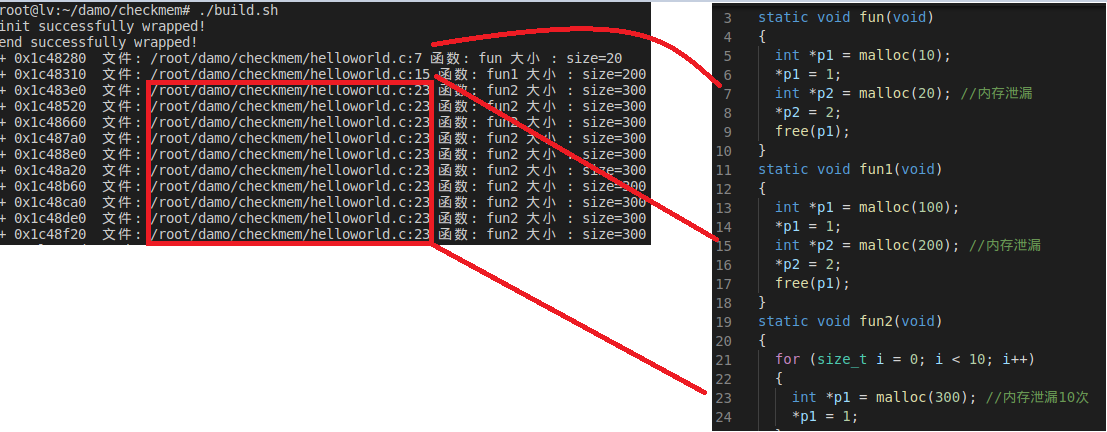
第五步 测试结果:

0.0分
0 人评分
C语言网提供由在职研发工程师或ACM蓝桥杯竞赛优秀选手录制的视频教程,并配有习题和答疑,点击了解:
一点编程也不会写的:零基础C语言学练课程
解决困扰你多年的C语言疑难杂症特性的C语言进阶课程
从零到写出一个爬虫的Python编程课程
只会语法写不出代码?手把手带你写100个编程真题的编程百练课程
信息学奥赛或C++选手的 必学C++课程
蓝桥杯ACM、信息学奥赛的必学课程:算法竞赛课入门课程
手把手讲解近五年真题的蓝桥杯辅导课程

发表评论 取消回复